
Your website has a built-in editor where you can write blog posts and publish them yourself – no coding, no waiting on us. This guide walks you through writing your first post, start to finish.
Step 1: Open your editor
- Go to [your-site.com]/editor (we'll send you the exact link – it's a good idea to bookmark it).
- If it asks you to sign in, click Sign in with GitHub. Otherwise it takes you straight in.
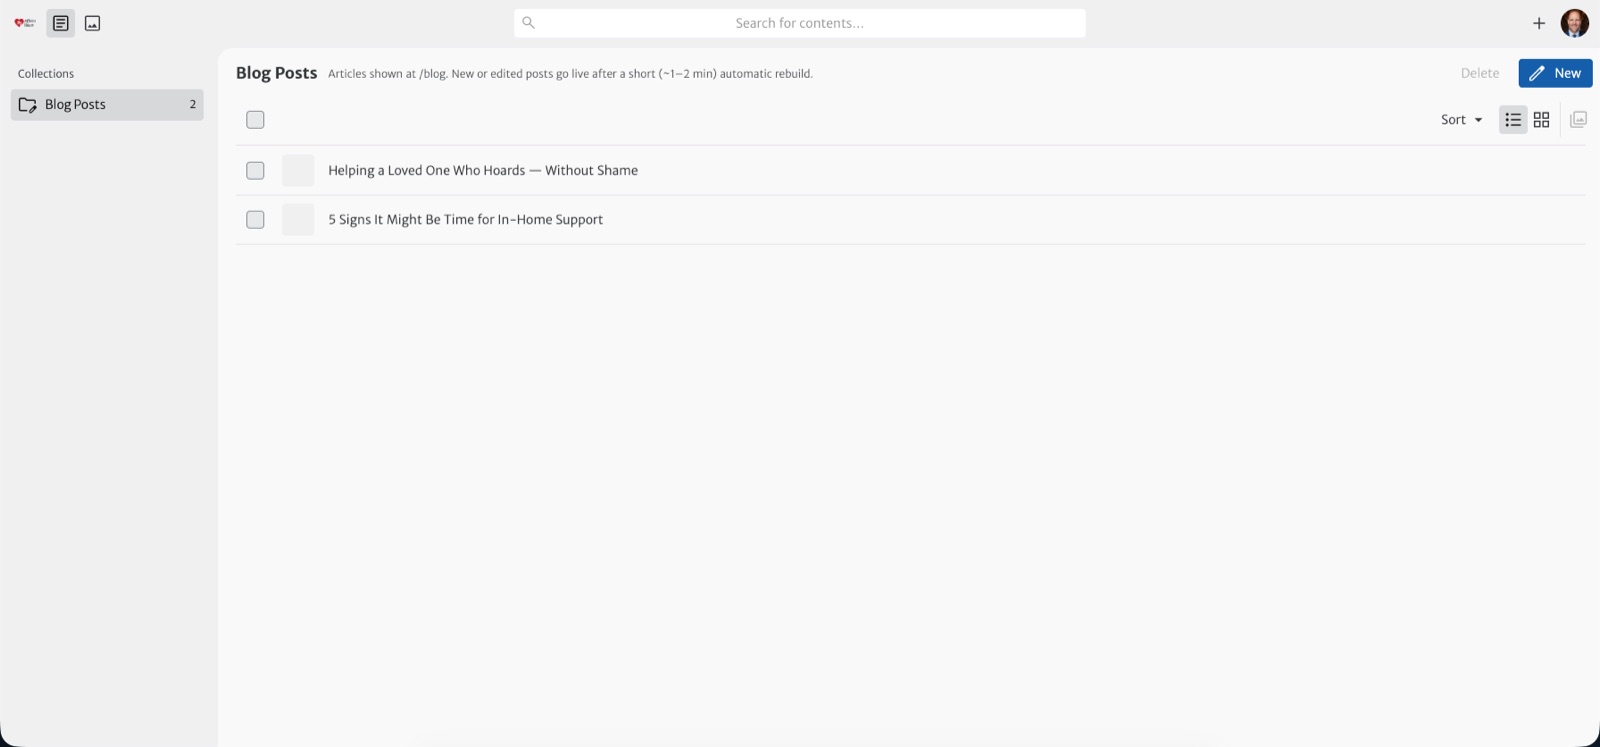
- On the left you'll see Blog Posts. Click it to see all your posts.
Step 2: Start a new post
With Blog Posts selected, click the blue New button in the top-right corner (you can see it in the screenshot above). A blank post opens with a few boxes to fill in.
Step 3: Fill in the details
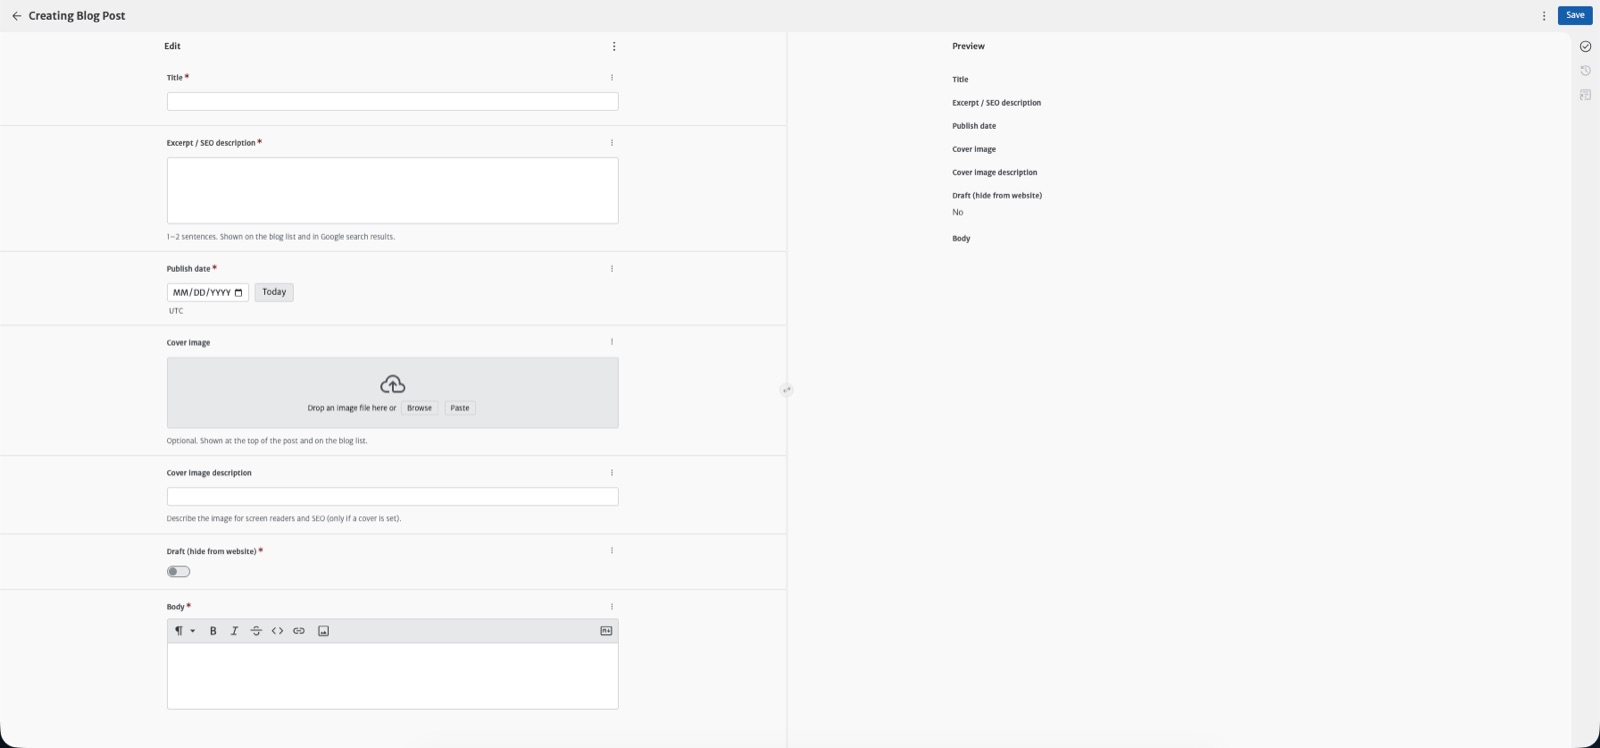
These boxes appear above where you'll write. Here's what each one is for:
- Title – the headline of your post. Keep it clear and specific (e.g. "5 Questions to Ask Before Booking a Caterer").
- Excerpt / SEO description – one or two sentences summing up the post. This is what shows on your blog list and in Google search results, so make it inviting.
- Publish date – click Today to use today's date, or pick a different one. Leave it as-is unless you want to date the post differently.
- Cover image (optional) – the photo shown at the top of the post and on your blog list. Drag a picture into the box, or click Browse to pick one from your computer. See the tip below for sizing.
- Cover image description – only if you added a cover. A short description of the photo (e.g. "Bride and groom cutting the cake") – this helps Google and visually-impaired readers.
- Draft (hide from website) – leave this off to publish. Turn it on if you want to save your work privately without it going live yet (more on this below).
Step 4: Write your post
Scroll down to the big Body box – this is where your post goes. Type just like you would in an email or Word document. The small toolbar at the top of that box lets you format your text:
- Bold and italic for emphasis.
- Headings to break the post into sections (great for longer posts).
- Bulleted and numbered lists.
- Links – highlight some words, click the link button, and paste a web address.
- Images – drop a photo right into the middle of your post using the image button.
- YouTube videos: click Insert, then YouTube video, and paste the link. See How to add a YouTube video to your post.
You can see this Body box and its toolbar at the bottom of the editor screenshot above.
Step 5: Publish it
- When you're happy with the post, click Save in the top-right corner.
- That's it – your post is published. It appears on your website within about 1–2 minutes (the site refreshes itself automatically).
- Visit [your-site.com]/blog to see it live. If it's not there yet, wait a minute and refresh the page.
Editing a post you already published
- Open your editor and click Blog Posts.
- Click the post you want to change.
- Make your edits, then click Save – your changes go live in a minute or two, just like a new post.
Hiding or unpublishing a post
Want to take a post off your website without deleting it? Open the post, turn Draft (hide from website) on, and click Save. It disappears from your live site but stays safe in your editor. Turn it back off and save again whenever you want it public.
Need a hand?
"I saved my post but I don't see it on my website."
Give it a minute or two and refresh – the site takes a moment to update. Also double-check the Draft switch is turned off.
"I can sign in but can't save."
This usually means an earlier setup step was missed. See How to access your blog editor, or just call us.
Still stuck? Call or text us at 888-757-4737 – we're happy to walk you through it.